Monday, February 17, 2014

Cran Banana Biscuits

By Pam Hadder

I have had this tea and biscuits theme running through my brain - must be the winter doldrums!  So this morning I decided to make some tea biscuits. I found a very simple recipe with flour, oil, bananas and soy milk - it seemed interesting, but with 4-1/2 cups of flour and no salt, no fruit etc, these seemed pretty heavy and Spartan - survival food! So my
Cran Banana Biscuits were born - I rev'd up the flavour, increased the fat and reduced the flour to a modest three cups et voilĂ ... the BEST part, these don't have to be kneaded or rolled out/cut; just drop from a spoon and bake.  Hope you will try and enjoy with your favourite hot cuppa xox


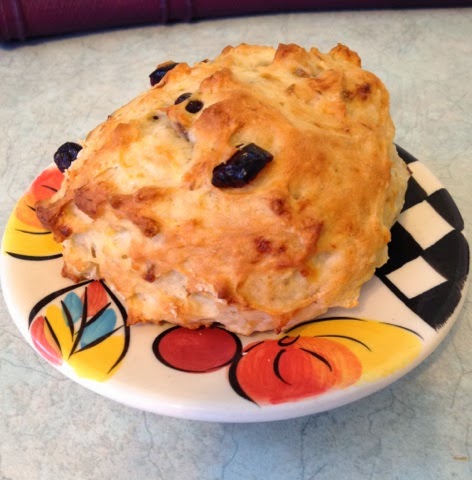
Pam's Cran Banana Biscuits

Ingredients:
3 ripe bananas, mashed well
1 cup dried cranberries
1 cup soy milk
2 tsp. apple cider vinegar
1/4 cup canola oil
zest of one orange (or lemon)
1/2 tsp. salt
2 Tbsp. sugar
3 cups flour
1 Tbsp. baking powder


Method:
Preheat your oven to 425 degrees Fahrenheit and line two baking sheets with parchment paper (or lightly oil with vegetable shortening). Place the soy milk in a small bowl and stir in the apple cider vinegar - set aside; this will curdle and thicken slightly.  Place the mashed bananas in a large bowl and stir in the cranberries, oil and zest.  In a medium bowl, combine the flour, sugar, baking powder and salt.  Add the milk mixture to the bananas and beat well until creamy.  Dump all of the dry ingredients into the wet mixture and stir just enough to combine - don't want to beat it, but you don't want floury bits either ;)  Using two tablespoons, scoop about 1/3 cup of the batter at a time onto the prepared baking sheets, allowing about 2" between each biscuit.  The batter will be moist, but it holds its shape in soft mounds.  Bake for 20 minutes - biscuits will be golden brown on top and moist/flaky inside.  Enjoy with vegan butter and fruit, or your favourite fruit preserves - I love my homemade, vegan strawberry freezer jam (sugar free and yummy!). xox


Sunday, February 16, 2014

Cheesy Vegan Fondue!

By Pam Hadder

For a lot of potential vegans, the hardest thing to imagine is life without cheese!  For me, it was butter, but then I discovered the marvels of coconut oil and other veganlicious delights. Nonetheless, when I received a vegan cookbook for Christmas and discovered a cheese fondue recipe in it, I was so excited - what could be nicer on a winter weekend than a leisurely, luxurious, cheese fondue accompanied by a crisp green salad and some excellent wines? So I had to try that recipe straight away!  The first thing that struck my attention was that the recipe did not include any vegan cheese - what the...???  How was this going to work? But I stuck with it, and a baguette and bottle of wine later...well, it was an amazing feed and I would never of known it was vegan.  I have made some adjustments to the excellent recipe, however - reduced the salt and completely replaced the water with wine (duh - that's a given!).  This fondue is easy to make and will serve 6 for a hearty appetizer or snack; if you combine with a big salad, you have a wonderful meal for four. Whether you are vegan or just looking for healthier alternatives from time to time, I hope you will indulge in this amazing fondue experience xo!

Pam's Cheesy Vegan Fondue

Ingredients:
1 clove fresh garlic, cut in half
1-1/2 cups white wine (something sweet and fruity - but not too sweet)
4 Tbsp. coconut oil, melted

1 tsp. sea salt
1 tsp. Marmite (or miso paste)
2 Tbsp. apple cider vinegar
1/4 cup nutritional yeast flakes
1/8 tsp turmeric (for colour)
1 cup raw cashews
3 Tbsp. cornstarch
1/2 tsp. granulated garlic
1 tsp. onion powder

Method:
Prepare the fondue pot by rubbing the inside thoroughly with the cut garlic halves- discard the left-over garlic pieces
. Place 1/2 cup of the wine to the side, and put all remaining ingredients into a blender, buzzing until creamy smooth (about 3 minutes). Heat the fondue pot to low, add the reserved 1/2 cup of wine to heat through. Pour in the blender mixture and continue to heat on low, whisking gently to avoid clumping/burning. The fondue will thicken in about 7-10 minutes. Dim the lights, cue the dreamy music and start dunking that bread!  Delicious!

Note: fondue can be prepared ahead on stove-top and reheated - will keep in the refrigerator for 3-4 days. xo