Tuesday, August 9, 2016

"Jacked" Vegan Bean Pot

By  Pam Hadder
I recently was gifted two vintage ceramic bean pots – my dear friend, Sharmila, is an avid aficionado of vintage and unusual cookware (search Facebook, Kitchenware – Traditional and Unusual).  I had no familiarity with bean pots, but Sharmila’s enthusiasm sparked my interest.  Searching online I found a number of “recipes” for microwave cakes and such, not the slow-cooked, from scratch options I was interested in.
 
I also found a wide variety of opinions on how to soak and prepare beans!  One seemingly reputable government site suggested adding oil to the cooking water, while others suggested a adding a pinch of baking soda.  One home economist suggested cold water pre-soaking for up to 48 hours!  Initially I tried the most common cold water soak, soaking overnight – using the covered bean pot as my soaking vessel, and with the addition of one teaspoon of salt.  This morning, I par-cooked the soaked beans as directed by a few online resources – adding two tablespoons of olive oil and simmering 45 minutes. The aroma was lovely, but the resulting beans were so soft, they were ready for white bean hummus or puree, not bean pot baked beans!  I cooled and bagged them to freeze for later use.

Very glad that I had a second bag of dried navy beans, I started fresh – seeking online information for cooking without overnight soaking. The following is my result – a culmination of conflicting online information, with the added zip of some Jack Daniels whiskey, chilies, bell peppers and fried, smoked tofu to make these vegan bean pot beans really special.  I hope you will try and enjoy, trusting that I have taken care of the leg work for you :)

Ingredients:
450 g/1 lb dry navy beans (no need to presoak)
210g/8 ounces smoked tofu, finely chopped, and seasoned
¼ cup olive oil, divided use
1 large yellow onion, chopped finely
1 large red bell pepper, chopped finely
1 tsp. sea salt
1 tsp. ground black pepper
1 tsp. crushed red chilies
1 teaspoon dry mustard
½ cup black strap molasses
½ cup brown sugar
¼ cup ketchup
1 tablespoon prepared yellow mustard
½ cup Jack Daniels whiskey
2 cups tomato juice (or orange juice)

Method:

Place beans in large soup pot, cover with four inches of water and bring to a boil over med-high heat.  Boil for 3 minutes, remove from heat (I set on back burner, no heat on), cover and let stand 40 minutes. Meanwhile, sauté the chopped onion with bell pepper in 2 tablespoons of the oil until onion is soft and translucent.  In another skillet, brown the chopped tofu in the remaining oil, stirring often.  Season the tofu to your taste with a little salt and pepper – this becomes the “bacon” for your beans.  Drain the beans, rinsing thoroughly with cold water. 

Measure four cups of the beans back into the soup pot. Add the crispy tofu, sautéed onion, and the remaining ingredients.  Stir to combine with a wooden spoon. Ladle the mixture into a 6-cup bean pot. Preheat the oven to 300 degrees Fahrenheit, making sure you have adequate clearance for your bean pot, and adjusting the racks if necessary.  Place the bean pot into the oven and bake for 4-6 hours, checking for doneness at four hours.


You may also wish to add more tomato or orange juice if the beans are still too firm, and extend the baking time accordingly until the desired texture is achieved. I reduced the temperature to 280 Fahrenheit and baked for a total of 7 hours. The baking time can be extended from the onset by reducing the heat to 275-280 degrees and planning for  an 8-10 hour baking time – so by cooking at a slightly lower temperature, beans could go in just before bedtime, and could be warm and ready in the oven for an amazing breakfast or brunch!  

Sunday, November 16, 2014

Nirvana Black Bean Burgers

By Pam Hadder

The quest has ended!  After years of making so-so black bean burgers, I have found the perfect combo of ingredients to produce a moist, flavourful patty - this truly is black bean burger heaven, hence the name: Nirvana Black Bean Burgers.

The best part of this whole situation - they are super easy to make and require no unusual or hard-to-find ingredients.  Another wonderful aspect is how amazing the aroma is when they are baking!  Once baked and cooled, I individually bagged and froze these - then you can pan-fry, BBQ or microwave, depending on your time and preferences.  A quick and easy option is to microwave to thaw (1-2 minutes per patty), and then broil in the toaster oven to get a nice crispy, brown exterior - I place the patties on a square of foil and flip mid-way when preparing them in this way - also great way to add melted vegan cheese, mmmm. Hope you will enjoy making these yummy vegan burgers - my recipe was adapted from many recipes I have tried over the years, and I am so happy that I finally found ingredients and proportions that work for me - in the past I found many bean burgers too bland or very dry xox


Nirvana Black Bean Burgers

Makes 12 patties - approximately 4.5" across and 1/2" thickness

Ingredients:
2 cans of black beans, well rinsed and drained
1 medium cooking onion
8 baby carrots, or one large carrot
1 small bell pepper - any colour
(I used yellow)
2 Tbsp. fresh crushed garlic, or approximately 6-8 cloves
6 Tbsp. chili sauce, ketchup or Sriracha sauce (chili for sweet 'n spicy, ketchup for milder flavour, and Sriracha for extra garlic and fire!)

2 Tbsp. corn starch
2 tsp. chili powder
2 tsp. ground cumin
1 tsp. ground black pepper
1/2 tsp. sea salt

1/2 tsp. seasoning salt
1 cup wheat flour or ground spelt
Approximately 1 cup, fine bread crumbs* 
(I use Pastene brand, seasoned bread crumbs, but you could use any type, or even crush your favourite healthy crackers!)
Method:
Preheat your oven to 350 degrees Fahrenheit. Line two baking sheets with parchment or wax paper, and spray lightly with vegetable oil.  If you don't have veg oil spray, just put a few drops of oil on your hands and lightly spread it over the parchment.

Mash the beans in a large bowl with a potato masher - I don't recommend blending or processing unless you have a really good appliance; you want the beans to be a bit coarse, not like a purée - this makes for a nicer texture.  Next place the onion, carrot, bell pepper, and Sriracha (or ketchup, chili sauce) into the blender - buzz until smooth.  In a small bowl, combine the cornstarch, chili powder, cumin, pepper, salt, seasoning salt, and flour - mix together to combine.  Add the wet mix from the blender to the mashed beans alternating with the dry spice and flour mix, then add in enough of the fine bread crumbs to make a good consistency for patties. For those of you that have worked with ground meat, the bean mixture will be slightly moister than meat-based burgers - this is how it should be. Add just enough crumbs to allow the mixture to bind together - no bits should be falling out.  *NOTE: it is hard to give a precise measure on the bread crumbs, as the size of the veggies and their moisture content will vary - you just have to get a feel for the right consistency - trust in your abilities and know you are very close to one kick-ass vegan burger!  

Using a small serving spoon or a tablespoon, scoop out about 1/3 to 1/2 cup of the bean patty mixture and plop it on the prepared baking sheet - pat it into a circle or square about 1/2" thick and smooth the edges with your finger tips.  Place the patties about 2" apart on the sheets. Bake for 12-15 minutes, flip patties and return to bake second side for another 12-15 minutes. 

These are amazing as a traditional burger on a bun, or on top of a crunchy salad, or just as-is for a quick protein fix. Hope you will try and enjoy - they are really just so yummy!  xox

Saturday, November 1, 2014

Eggless!

By Pam Hadder

For so many years I choked down eggs – they grossed me out, but I was told they were good for me!  In my early 30s eggs were a big part of low-carb dieting that allowed me to keep my weight down even when work and family demands kept me from engaging in the physical activities I had once enjoyed.  Looking back, eating all of the meat and eggs was soul-less for me – most of the time I was politely swallowing while trying to distract myself from the dead animal realities. It was functional and disengaged consumption.

Now I have been dairy-free for over 14 years and vegan for about three years and eggs are one thing I do not miss.  Having not eaten them in so long, the sulphurous odor is really repulsive for me when I am in a restaurant, or when one of my kids is cooking them!  Yes, I live among omnivores but for me, "scrambled" silken tofu with veg has become my weekend breakfast treat - great in a vegan crepe, with toast, or solo. Although I am a vegan, I am not an enforcer type – it is my choice not necessarily theirs, and I do not preach to my kids about my choices; they always have omnivorous options as they choose without my judgement.  I still make my son his “love eggs” (basically scrambled with LOTS of butter, lol), but I feel good about the choices I make daily with my diet

And although I recognize my choices are not those of the majority, I do share my vegan recipes and tips in the hope that a few folks will consider Meatless Mondays or will sub some vegan meals into their diet.  Vegan eating is heart-smart, is a natural fit for those of us that love all animals, and may contribute to the betterment/sustainability of Earth’s ecosystems.

Another concern of those wanting to go egg-less is all of the recipes that call for eggs – for baking, this is an easy fix.  Here are a few options to substitute for one large egg in any muffin, cake or cookie recipes.  You will find that most family favourites can be converted with great success and with equal or improved taste:


One small banana mashed = one lg. egg
1/3 cup unsweetened apple sauce = one lg. egg
1/3 prune puree = one large egg
1 Tbsp. ground flax or chia seed and 3 Tbsp. water = one lg. egg
(NOTE: cover flax/chia mixture and chill 15 minutes prior to use)

Additionally, Bob’s Red Mill foods sells an egg replacer that works very well in many recipes without altering the flavours.  Prune and flax eggs do have distinctive flavours, particularly for those new to these ingredients – therefore, you will want to use them in recipes that have strong flavours like chocolate or spice (i.e. ginger snaps, brownies) to avoid having the flax or prune overwhelm the recipes.  Chia is perhaps the most neutral of the homemade options, and Bob’s Red Mill’s is a great option for those who don’t want to fuss with grinding their own flax or chia seeds.  Bob’s is made with flax, but their process neutralizes any strong flax flavours.

Many other ingredients, such as potatoes, oatmeal and agar agar naturally serve as binders so you may need to surf the web and try some recipes posted by vegan cooks. Some recipes just need a bit more oil to compensate for the absence of animal eggs.  I will admit, some vegan recipes I have found online and tried were duds, but the vast majority were just amazing.  Here is a link to PETA’s site with several more options for replacing eggs in your recipes.  Enjoy in excellent health xox

Monday, September 29, 2014

Oaty-Carrot Cookies

By Pam HadderThis recent vegan cookie experiment was a home-run with my young son (my resident cookie expert), so I am making sure I share this with you while all my proportions and ingredients are fresh in my mind!

After trolling the Internet to find a good new oatmeal cookie indulgence, this resulted.  Many of the recipes that looked interesting were not vegan, and many of the vegan ones had tired/bland flavour profiles.  The addition of carrot adds a muffiny moistness to this recipe - and the cinnamon glaze (optional) contributes a cinnamon bun-like hit of sweetness (as if you aren't sweet enough, awww.....).  Happy baking - hope you will enjoy these in good health xox.


Pam’s Oaty-Carrot Cookies

Ingredients for cookie dough:
1 cup quick oats
1-3/4 cups all purpose flour
½ cup sugar
¾ cup brown sugar
1/8 tsp. sea salt
2 tsp. cinnamon
½ tsp. ground cloves
1 cup dried cranberries (or other fav dried fruit)
¾ cup chopped walnuts
½ cup toasted, flaked coconut* (crushed) – you could use any coconut here!
1 tsp. baking soda
½ tsp. baking powder
Egg replacer for two large eggs**
3 tsp. vanilla extract
1 cup coconut oil, melted and cooled (should be warm but not super hot!)
2 cups finely grated carrot (I use my steel zester for this – really fast and nice, fine gratings)


Ingredients for cookie glaze:
1 cup icing sugar
1 tsp cinnamon
2-3 Tbsp. of hot water

(**I purchase the toasted coconut flakes at Costco – very intense toasty flavor!  You could also toast your own - just place the coconut in a nonstick pan over med-low heat; stir constantly until browned – you need to stir or it won’t toast evenly and bits will burn.)
(*I used Red Mills Egg Replacer, but 2/3 applesauce or one medium-sized mashed banana would also work for this recipe.)

Method:
Preheat your oven to 350 degrees Fahrenheit and line three baking sheets with parchment paper or wax paper. Combine all dry ingredients in a large bowl: flour, sugars, salt, baking soda and baking powder, spices, coconut and cranberries.  In a medium-size bowl, combine your egg replacer (for two eggs – or use one banana; or 2/3 cup unsweetened apple sauce), cooled coconut oil and vanilla extra – stir to combine.  Add the grated carrot to the wet ingredients, stirring once more. Pour wet ingredients into dry and stir just to combine – this forms a firm yet moist cookie dough.   Scoop out rounded tablespoons of dough and place the mounds on the prepared baking sheets, about 2” apart.  Try to make the mounds a consistent size so that you have evenly baked cookies in the end!  Bake on the centre rack of your oven for 15 minutes – depending on the moistness of your carrots, you may need to adjust the time plus or minus 3-5 minutes.  I recommend checking them around minute 12, and I always bake a “test cookie” – my son is the happy tester/baking expert!  If it passes his scrutiny, it’s a winner, lol! 

To make the glaze, stir the cinnamon into the icing sugar and gradually add the hot water to form a thick syrup consistency -drizzle this over the cookies while warm.

This recipe yielded 3.5 dozen cookies for me, but it will depend on the size of your scooping!  Enjoy xoxo

Tuesday, September 2, 2014

Summer Harvest Soup

By Pam Hadder

I love soup - no matter the season, to me, no meal says comfort quite like soup!  Soups are typically quite fast and economical to make - it's great to improvise with what you have on hand, or to suit what is available in the garden or your local market.  Tonight I was craving something savoury, but was feeling exhausted.  However, I am glad I dragged my butt into the kitchen, because in less than an hour, this soup recipe was ready and I had a very happy tum :) Good soup just sets your heart right, you know what I mean?

This vegan acorn squash soup makes use of some of the early summer harvest: local carrots, celery, onions and baby potatoes along with a less typical blend of seasoning.  There are also some options provided to help you create your own signature version - very easy to add or sub other fresh veg based on what you have available. I enjoyed my serving with rye toast and sliced tomatoes on the side - hope you will try and enjoy xox

Ingredients:
1 medium-size acorn squash

2 Tbsp. coconut oil
1 medium cooking onion, finely chopped
3 medium carrots, peeled and thinly sliced
2 ribs celery (or four leafy ribs from the heart), chopped thinly
12 baby potatoes, washed and chopped in 1/2" pieces

2 cloves fresh garlic, finely minced or pressed
3-4 cups vegetable stock (or water, but stock is preferred)
2 rounded Tbsp. whole grain mild mustard (I like Maille brand, L'Ancienne Old Style Mustard)
1 tsp. dried basil
1/2 tsp. sea salt

1/2 tsp. dried crushed red chilies
Fresh ground black pepper to taste (I use about 1/2 tsp.)

1 can of coconut milk (approx. 1.5 cups)

Method:
Wash the acorn squash and cut it in half, scooping out the seeds and stringy pulp.  Place the halves cut-side down on a large plate, adding a couple of tablespoons of water and covering tightly with microwave-safe wrap.  Microwave for 15-17 minutes - a sharp knife should easily pierce through the skin when the squash is ready.  Cooking time may vary depending on your microwave and the size of your squash.  While the squash is cooking, melt the coconut oil over medium heat in a large covered saucepan.  Add the onion, carrots, celery and baby potatoes; stirring intermittently, cook for about 10 minutes (onion should be clear and vegetables should be par-cooked but not mushy. Add in the garlic and cook 3-4 minutes longer, stirring as needed.  Stir in the salt, pepper, chilies, basil, mustard and vegetable stock, bring to a simmer and reduce heat if mixture begins to boil. Continue to simmer until the squash is ready.  When the squash is cooked, scoop out all of the flesh into a medium bowl and mash it coarsely with a fork or potato masher. Add all of the squash to the soup mixture, and stir in the coconut milk.  Continue to simmer for 5 minutes - serve and enjoy.


Options:
I like a rustic, chunky texture to my soup, but if you prefer a velvety texture, this soup can be blended using a counter-top blender or immersion blender. Alternatively, you can scoop out half of the soup, blend it and add it back to the chunky veg in the saucepan (compromise between puréed and chunky, lol!) Some great add-ins or substitutions for the veg ingredients would be finely chopped broccoli or cauliflower (about one cup); or fresh corn off the cob (peaches and cream, mmm - just use a small knife and scrape those kernels into the pot!). Add these optional veggies with the onion, celery etc. when you sauté. Also, depending on how long the soup simmers and your personal preference for consistency, you may wish to add a bit more broth.  

Monday, February 17, 2014

Cran Banana Biscuits

By Pam Hadder

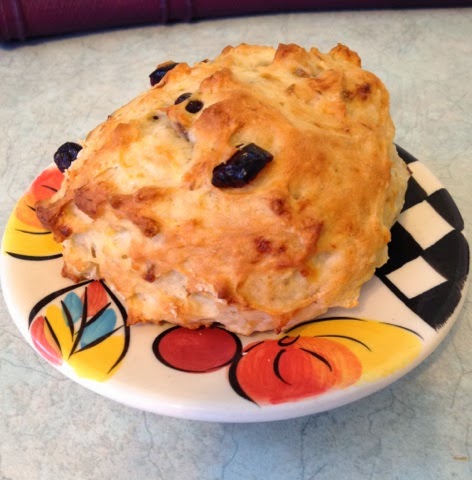
I have had this tea and biscuits theme running through my brain - must be the winter doldrums!  So this morning I decided to make some tea biscuits. I found a very simple recipe with flour, oil, bananas and soy milk - it seemed interesting, but with 4-1/2 cups of flour and no salt, no fruit etc, these seemed pretty heavy and Spartan - survival food! So my
Cran Banana Biscuits were born - I rev'd up the flavour, increased the fat and reduced the flour to a modest three cups et voilà... the BEST part, these don't have to be kneaded or rolled out/cut; just drop from a spoon and bake.  Hope you will try and enjoy with your favourite hot cuppa xox


Pam's Cran Banana Biscuits

Ingredients:
3 ripe bananas, mashed well
1 cup dried cranberries
1 cup soy milk
2 tsp. apple cider vinegar
1/4 cup canola oil
zest of one orange (or lemon)
1/2 tsp. salt
2 Tbsp. sugar
3 cups flour
1 Tbsp. baking powder


Method:
Preheat your oven to 425 degrees Fahrenheit and line two baking sheets with parchment paper (or lightly oil with vegetable shortening). Place the soy milk in a small bowl and stir in the apple cider vinegar - set aside; this will curdle and thicken slightly.  Place the mashed bananas in a large bowl and stir in the cranberries, oil and zest.  In a medium bowl, combine the flour, sugar, baking powder and salt.  Add the milk mixture to the bananas and beat well until creamy.  Dump all of the dry ingredients into the wet mixture and stir just enough to combine - don't want to beat it, but you don't want floury bits either ;)  Using two tablespoons, scoop about 1/3 cup of the batter at a time onto the prepared baking sheets, allowing about 2" between each biscuit.  The batter will be moist, but it holds its shape in soft mounds.  Bake for 20 minutes - biscuits will be golden brown on top and moist/flaky inside.  Enjoy with vegan butter and fruit, or your favourite fruit preserves - I love my homemade, vegan strawberry freezer jam (sugar free and yummy!). xox


Sunday, February 16, 2014

Cheesy Vegan Fondue!

By Pam Hadder

For a lot of potential vegans, the hardest thing to imagine is life without cheese!  For me, it was butter, but then I discovered the marvels of coconut oil and other veganlicious delights. Nonetheless, when I received a vegan cookbook for Christmas and discovered a cheese fondue recipe in it, I was so excited - what could be nicer on a winter weekend than a leisurely, luxurious, cheese fondue accompanied by a crisp green salad and some excellent wines? So I had to try that recipe straight away!  The first thing that struck my attention was that the recipe did not include any vegan cheese - what the...???  How was this going to work? But I stuck with it, and a baguette and bottle of wine later...well, it was an amazing feed and I would never of known it was vegan.  I have made some adjustments to the excellent recipe, however - reduced the salt and completely replaced the water with wine (duh - that's a given!).  This fondue is easy to make and will serve 6 for a hearty appetizer or snack; if you combine with a big salad, you have a wonderful meal for four. Whether you are vegan or just looking for healthier alternatives from time to time, I hope you will indulge in this amazing fondue experience xo!

Pam's Cheesy Vegan Fondue

Ingredients:
1 clove fresh garlic, cut in half
1-1/2 cups white wine (something sweet and fruity - but not too sweet)
4 Tbsp. coconut oil, melted

1 tsp. sea salt
1 tsp. Marmite (or miso paste)
2 Tbsp. apple cider vinegar
1/4 cup nutritional yeast flakes
1/8 tsp turmeric (for colour)
1 cup raw cashews
3 Tbsp. cornstarch
1/2 tsp. granulated garlic
1 tsp. onion powder

Method:
Prepare the fondue pot by rubbing the inside thoroughly with the cut garlic halves- discard the left-over garlic pieces
. Place 1/2 cup of the wine to the side, and put all remaining ingredients into a blender, buzzing until creamy smooth (about 3 minutes). Heat the fondue pot to low, add the reserved 1/2 cup of wine to heat through. Pour in the blender mixture and continue to heat on low, whisking gently to avoid clumping/burning. The fondue will thicken in about 7-10 minutes. Dim the lights, cue the dreamy music and start dunking that bread!  Delicious!

Note: fondue can be prepared ahead on stove-top and reheated - will keep in the refrigerator for 3-4 days. xo